ASP.NET 4.0 AJAX - Preview 4 - Client Templates
 A little over a month ago, Microsoft released the fourth preview of ASP.NET 4.0 AJAX. This is the new release of the Microsoft AJAX Framework that will be released with ASP.NET 4.0. We’re getting closer to the RTM release of .NET 4.0 (hopefully later this year), so I figured this would be a good time to start posting about ASP.NET 4.0 AJAX. There are some very exciting things coming along with ASP.NET 4.0, and the ASP.NET AJAX component is no exception. The best news about ASP.NET AJAX is that you can start using it today without having to wait for the full blown ASP.NET AJAX framework. Keep in mind that these components are still in “preview” mode (meaning no Microsoft support), though they are usable at your own risk. For more information, you can check out the license on CodePlex.
In this post, I’ll be talking about the client templates that can be found in the latest release. Client templates are very powerful. They are a key component for rich client-side applications. Up until now, I have been using jTemplates, a client template solution plugin for jQuery. If you aren’t familiar with jTemplates, check out Dave Ward’s article “[Use jQuery and ASP.NET AJAX to build a client side Repeater][1].” jTemplates is really a nice plugin, but it’s a bit disconnected from the flow of the page. Enter ASP.NET 4.0 AJAX and the DataView control.
Introducing the Sys.UI.DataView Control
The ASP.NET AJAX DataView (not to be confused with the ADO.NET DataView), is a new control that functions similar to a server-side repeater as you will see. The first thing to note with the DataView is that this control operates without ASP.NET, meaning you can use this in any framework or even a straight HTML page. This shouldn’t be too much of a surprise, since you can download the ASP.NET AJAX Library 3.5 as standalone scripts today. Having said that, let’s start with an simple example that will just run in a standard HTML page. For this first example, I will walk through declaratively setting up template binding. Let’s get started…
Want to follow along with the examples? [Download Them - 88K][2]
DataView and Declarative Binding
In order to use the Microsoft AJAX Templates, you need to first reference two scripts, MicrosoftAjax.js (or MicrosoftAjax.debug.js) and MicrosoftAjaxTemplates.js (or MicrosoftAjaxTemplates.debug.js). These files can be found in the ASP.NET Ajax Preview 4.zip file from CodePlex. These would be added to the head of your page.
<script type="text/javascript" src="scripts/MicrosoftAjax.debug.js"></script>
<script
  type="text/javascript"
  src="scripts/MicrosoftAjaxTemplates.debug.js"
></script>
Next, we’ll move on to the body. In the body tag, you need to specify a few namespaces and add a command, as shown in the snippet below.
<body
  xmlns:sys="javascript:Sys"
  xmlns:dataview="javascript:Sys.UI.DataView"
  sys:activate="*"
>
  ...
</body>
The first namespace being registered is sys. This is needed for all the templates, whether you activate them declaratively or imperatively. The sys prefix points to the Microsoft AJAX Library’s Sys class. The next two attributes are needed for declarative activation/binding. In the second xmlns attribute, we are registering the prefix dataview. This namespace refers to the Sys.UI.DataView AJAX control. The final attribute being added to the body tag is sys:activate. The value for sys:activate can be “*” which means activate anything on the page with sys:attach (which we will discuss shortly).” Activating in this sense, means binding the templates when the page loads. Note, that instead of using an asterisk for sys:activate, you could also have a comma-delimited list of the ids to bind on page load. This is a better approach if you have a complex page since wildcards always seem to introduce some sort of delay. Now that we have the framework setup, let’s move on to the actual template using the DataView. For this example, I will render an unordered list, but you can use any standard HTML markup that you want. To keep this example simple, I will bind to a JavaScript array defined in page, but later will discuss binding to a service.
<ul
  id="nflList"
  class="sys-template"
  sys:attach="dataview"
  dataview:data="{{ nfcEast }}"
>
  <li><a href="{{ Homepage }}">{{ Team }}</a></li>
</ul>
Let’s take a closer look at what’s going on. Starting with the UL element, you can see the typical id and class attributes. You may think the class definition looks a bit peculiar, and you’d be correct. The class sys-template is used as a convention for hiding the template until binding occurs. This class needs to be defined somewhere in your stylesheet.
.sys-template {
  display: none;
}
Remember, you can always define multiple classes on an element by space-delimiting them. For example:
<ul class="”myClass" sys-template” ...></ul>
Next, we have our sys:attach, which I briefly mentioned earlier. This property assigns the DataView to this element. This is equal to you manually wiring up the template using the $create shortcut
(which will be discussed in the DataView and Imperative Binding section). The sys:attach value is a reference to the namespace of dataview that we defined on the body element earlier. The final attribute is dataview:data. As you may have guessed, this is a reference to the data source we need to bind to, and remember in this example I’m just binding to a JavaScript array. Note, the array name is wrapped in double curly-braces
I’m missing football season (Go Giants), so I decided to go with an NFL theme for the sample data, as you can see.
var nfcEast = [ { Team: "New York
Giants", Homepage: "http://www.giants.com/" }, { Team: "Philadelphia Eagles",
Homepage: "http://www.philadelphiaeagles.com/" }, { Team: "Dallas Cowboys",
Homepage: "http://www.dallascowboys.com/" }, { Team: "Washington Redskins",
Homepage: "http://www.redskins.com/" } ]
Now on to the template itself. This is where we set up the binding of the properties. The
{{ ... }}
blocks designate one-way / one-time binding. This syntax is very similar to the server side Eval() statements that we use when binding in ASP.NET. When this is bound, the DataView acts like a repeater and creates a new <li></li> for each row of data. You can see the rendered HTML in Figure 1. The output is shown in Figure 2. 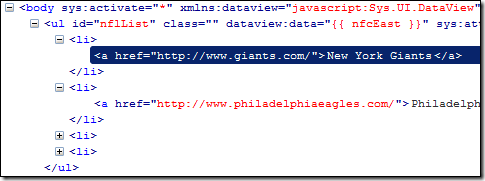 Figure 1: The Rendered HTML After Binding (From FireBug)
  Figure 2: The Output ### DataView and Imperative Binding In the last example, I showed how you can use declarative binding and the DataView control. Let’s now look at how the code looks if we decide to wire things up ourselves. I will keep everything the same as the last example so that you can clearly see the differences. First, let’s review the changes to the HTML code:
<body xmlns:sys="javascript:Sys">
  <ul id="nflList" class="sys-template">
    <li><a href="{{ Homepage }}">{{ Team }}</a></li>
  </ul>
</body>
You’ll notice that body only has a namespace declaration for sys and the <ul></ul> now just has an id and class. Now for the JavaScript to do the binding:
Sys.Application.add_init(appInit);
function appInit() {
  $create(Sys.UI.DataView, { data: nfcEast }, null, null, $get("nflList"));
}
Not too much here, and it’s standard code ASP.NET AJAX is today. First, we are wiring up a handler (the appInit function) for the application init event. This init event is raised after all scripts have been loaded, but before objects are created. In the appInit function, we are simply manually wiring up the Sys.UI.DataView control as we would do with an ASP.NET AJAX control in the current ASP.NET AJAX library. The $create method takes five parameters, the signature is <a href=”http://msdn.microsoft.com/en-us/library/bb397487.aspx” target=”_blank”
$create</a (Type type, properties, events, references, element). For the parameters, we start by passing the Sys.UI.DataView for the type. Next, we have an object literal of the property and the value, in this case we are setting the data property with our array. There are no events or references needed, so those values are simply null. Finally, we need to pass the element using the <a href=”http://msdn.microsoft.com/en-us/library/bb397717.aspx” target=”_blank” $get shortcut</a
(which does a document.getElementById under the covers). Running this code is identical to the declarative method, in that on the application initialization, the template is filled with data. One other useful function is replacing the data in your template. This can simply be done using the syntax:
javascript $find("ID OF THE ELEMENT").set_data(THE JSON DATA);## Binding the DataView to a WCF REST Service As promised earlier, let’s walk through binding a DataView client-template to a WCF Service. The DataView can bind to any JSON serialized object. For this particular example, I will use a REST WCF service hosted in an ASP.NET Website. If you are not familiar with WCF and REST services, have a look at <a href=”http://blogs.conchango.com/anthonysteele/archive/2008/03/15/rest-from-wcf-3-5.aspx” target=”_blank” this</aor <a href=”http://www.code-magazine.com/Article.aspx?quickid=080014” target=”_blank” this</a
article. First, let’s take a look at the service itself. In the .svc file, I’ve declared the ServiceHost:
```aspx-cs <%@ ServiceHost Language=”C#” Service=”SampleService” CodeBehind=”~/App_Code/SampleService.svc.cs” Factory=”System.ServiceModel.Activation.WebServiceHostFactory” %>
The Factory declaration there is to eliminate the need of
configuring the service in the web.config. The
<a
href="http://msdn.microsoft.com/en-us/library/system.servicemodel.activation.webservicehostfactory.aspx"
target="\_blank"

> WebServiceHostFactory</a
>
> automatically uses the WebHttpBinding and WebHttpBehavior. Now for the code…

````csharp
[ServiceContract(Namespace = "")]
[AspNetCompatibilityRequirements(RequirementsMode =
AspNetCompatibilityRequirementsMode.Allowed)] public class SampleService{ public
SampleService() {} [DataContract] public class NFLTeam { [DataMember] public
string Team { get; set; } [DataMember] public string Homepage { get; set; } }
[OperationContract] [WebGet(UriTemplate = "getTeams", ResponseFormat =
WebMessageFormat.Json)] public List<NFLTeam>
  GetTeams() { return new List<NFLTeam>
    { new NFLTeam { Team = "New York Giants", Homepage =
    "http://www.giants.com/" }, new NFLTeam { Team = "Philadelphia Eagles",
    Homepage = "http://www.philadelphiaeagles.com/" }, new NFLTeam { Team =
    "Dallas Cowboys", Homepage = "http://www.dallascowboys.com/" }, new NFLTeam
    { Team = "Washington Redskins", Homepage = "http://www.redskins.com/" } }; }
    } ``` Nothing really out of the ordinary going on in the code. I’m simply
    returning a generic list of objects for this example so that you don’t need
    a database or anything to run the samples if you download them. One thing to
    note if you are not familiar with REST services in WCF, the WebGet attribute
    specifies that if we are using a WebHttpBinding, this method can be called
    using the GET verb. As parameters, I have set the UriTemplate to be
    getTeams, this means that the URL to access the service will be
    ../SampleService.svc/getTeams. Finally, since the DataView binds to
    <a href="http://json.org/" target="_blank">JSON</a> objects, the
    ResponseFormat property specifies the result should be serialized as
    <a href="http://www.json.org/example.html" target="_blank">JSON</a>. Now
    with our service in tack, we can work on the DataView code. Again, in this
    example I will show the setup in a simple HTML page, illustrating how the
    Microsoft ASP.NET AJAX 4.0 Library can be used without ASP.NET. I will skip
    the script and body declarations since I showed them in the previous
    examples. For this DataView, I will use an HTML TABLE and bind
    declaratively.


<!--  -->
```html
    <table>
      <tbody
        id="nflListBody"
        class="sys-template"
        sys:attach="dataview"
        dataview:autofetch="true"
        dataview:httpverb="GET"
        dataview:dataprovider="SampleService.svc"
        dataview:fetchoperation="getTeams"
      >
        <tr>
          <td>{{ Team }}</td>
          <td><a href="{{ Homepage }}">{{ Homepage }}</a></td>
        </tr>
      </tbody>
    </table>
A few of the attributes required for the DataView should look familiar, the id, class, and the sys:attach. Let’s take a closer look at the rest.
<table style="max-width: 500px;">
  <tr>
    <td>
      <code>dataview:autofetch</code>
    </td>

    <td>
      Indicates if the data should be retrieved immediately from a data
      source when the page loads.
    </td>
  </tr>

  <tr>
    <td>
      <code>dataview:httpverb</code>
    </td>

    <td>
      A string indicating the the HTTP method. The default method is POST,
      but in my case, the REST service is using GET.
    </td>
  </tr>

  <tr>
    <td>
      <code>dataview:dataprovider</code>
    </td>

    <td>
      The data provider the DataView should use to get the data. This is a
      path to the svc file. In my example, the service is in the root with
      the sample page.
    </td>
  </tr>

  <tr>
    <td>
      <code>dataview:fetchoperation</code>
    </td>

    <td>The querystring or method name to use to retrieve the data.</td>
  </tr>
</table>

The DataView template itself should look familiar. Again I am using one-way,
one-time bindings. Really the only difference is where the template is
defined for the table. The DataView element for a table should be defined on
the `<tbody>` so that the repeating works correctly, otherwise if you add it to the
  table and just have a structure without the tbody like
  <table>
    <tr>
      <td>...</td>
    </tr>
  </table>
you’ll get incorrect output as shown in Figure 3. 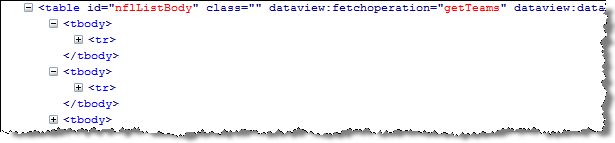
Figure 3: Incorrect output If you put the DataView on the TABLE Element
Passing Parameters
Using the DataView and REST One final note on using REST services with the DataView. During the course of my testing, I ran across a problem when trying to pass parameters to a REST service. In the last example, I didn’t pass any parameters to the method being called by the DataView, but if you were going to pass parameters, you would typically use the fetchParameters property for example:
<div
  class="list sys-template"
  sys:attach="dataview"
  dataview:autofetch="true"
  dataview:httpverb="GET"
  dataview:dataprovider="SampleService.svc"
  dataview:fetchoperation="getGreeting"
  dataview:fetchparameters="greeting: 'Hello World'"
>
  {{ Text }}
</div>
When the DataView goes out and makes the request using the fetchparamerters, it ends up being: /SampleService.svc/getGreeting?greeting=Hello%20World. The proper syntax for the REST service should be /SampleService.svc/getGreeting/Hello%20World.** **In order to get the proper syntax for REST service, you should append the parameters as part of the fetchoperation.
<div
  id="greeting"
  class="sys-template"
  sys:attach="dataview"
  dataview:autofetch="true"
  dataview:httpverb="GET"
  dataview:dataprovider="SampleService.svc"
  dataview:fetchoperation="getGreeting/Hello World"
></div>
Notice the fetchopertion in that example, appending the parameters to the end gives us the correct format. ## Conclusion I hope you enjoyed this introduction to the DataView and ASP.NET 4.0 AJAX. If you’ve been inspired to find out more about the DataView and the other features found in ASP.NET 4.0 AJAX, be sure to check out the samples and documentation found on Codeplex. Looking to try the code in this post out for yourself?
[Download Them - 88K][2] [1]: http://encosia.com/2008/06/26/use-jquery-and-aspnet-ajax-to-build-a-client-side-repeater/ [2]https://images.visoftinc.com/2009-04-28/DataViewSamples.zip
</tbody>
````

Damien White Twitter
Hi, my name is Damien White. I'm a software architect with over 20 years of experience. I simply love coding! I have a driving passion for software development, and a thirst for knowledge that cannot be quenched. I enjoy writing Web and Mobile applications, and I'm happy to share what I know in my quest to learn as much as possible.