Ember.js - A Primer

All my previous Ember.js posts either walked you through examples or pointed out this or that about the framework. Well, if you read my last post, you may just be starting out with Ember and all those other posts may be over your head. Ember isn’t that complex, nor is it magic. In this post we’ll go over key constructs of Ember
Breaking Down Ember Into It’s Parts
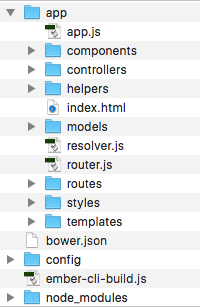
Ember is composed of various parts. Creating a new Ember application using Ember-CLI and opening the app directory will give you a good idea of the most important parts of an Ember application (Figure 01).
The Router
Let’s start from the most important part of Ember, and the entry to every one of your “pages”, the router. The router is the heart and soul of Ember. It’s what converts URLs into things that your users see. The router and routes are two separate parts, but work hand-in-hand. The router is where you say “hey Ember, I want my app to respond to books”. This is a single line in router.js, under the Router.map:
Router.map(function () {
  this.route("books");
});
Depending on your locationType setting (defined in config/environment.js; default is set to auto), this will give you a URL like /books (history/auto setting) or /#/books (hash/auto setting). The best bet here is to stick with auto, it will default to history for browsers that have the capability. If your users are using an old browser (I’m looking at you Internet Explorer), it will revert to using the hash setting for the URL and you don’t have to fuss with anything.
The Route
At this point we have a place to point our browsers at, but no content or way to load any data. Well, Ember-CLI can help us with this (or you can create the files manually, there’s no magic in Ember-CLI’s blueprint generators). The command to generate a route is simply ember g route <name>. In our case, we’re working with books, so we’d want ember g route books (where the g stands for generate, but who wants to type that all the time!). In the output, you’ll see what Ember-CLI has created for us (Figure 02).

It created three files for us, app/routes/books.js, app/templates/books.hbs, and tests/unit/routes/books-test.js. It also added the route books for us in router.js, which we did earlier. Don’t worry, it smart enough to know it already exists, so you don’t have two entries now. Like I said earlier, there’s no magic here and you could create these files yourself, but Ember-CLI makes it so much easier. Plus, Ember-CLI generates an appropriate test for whatever we are generating. This is a good thing because testing is ultra important. We’ll talk about testing a little later, but if you’re interested in TDD with Ember, I recommend you check out my tutorials published by my friends at Semaphore CI.
Let’s focus on the app/routes/books.js, since that’s the actual route object. The route is responsible for loading data for the template (the other file created app/templates/books.hbs). This might be confusing to you if you come from a server-side MVC framework and are thinking of those routes. Disconnect from that train of thought, we’re doing client-side development and models/data is loaded by the route. A route contains various hooks, but the one most commonly used is model. For example, continuing with the books example, we’d probably have something like this:
export default Ember.Route.extend({
  model: function () {
    return this.store.findAll("book");
  },
});
Here we are hooking into the model hook to return data for our template. In this case, we’re using ember-data (which gives us this.store.findAll) to load all the books from our API. We can now utilize this data in our template by referencing model (which is an array of books).
Templates
The next piece of the Ember.js framework is templates. These are hbs files, which is stands for Handlebars templates. Handlebars allows us to build “semantic templates”. Let’s look at a simple example of looping through our books model from the last section (within app/templates/books.hbs):
<ul>
  {{#each model as |book|}}
  <li>{{book.title}}</li>
  {{/each}}
</ul>
You’ll notice that Handlebars is injected into standard HTML. It takes two forms, the block form like #each, note it starts with a # and ends like an HTML tag with /each. The other form is the inline version, which will output whatever is inside the Handlebars, in our example book.title will result in, you guessed it, the book title. Pretty straightforward, right? What if you wanted to add, for instance, a click event to each book (sort of a silly example, but let’s go with it)? In previous versions of Ember, before v2.0, you might have used a View to accomplish this task. Views have been deprecated and are gone in Ember 2.0+, but just know that these used to be used to inject JavaScript code into a template. Since Views are gone, let’s look at the replacement.
Components
Components are reusable bits of code. They are simply a Handlebars template and a JavaScript file. Components are not only reusable, but they can clean up your main templates dramatically. Not only that, in future versions of Ember, they will be introducing routable-components, so you can route directly to your component from the URL. Given that, it makes sense to prefer components for most functionality. Let’s take our book list for example, with Ember-CLI we can simply generate a component. Note that all components must contain a dash, this is to ensure that our components don’t bump up against future components provided by browsers. The command, as you probably guessed, is just ember g component book-list. It again creates three files for us, the JavaScript: app/components/book-list.js, the template: app/templates/components/book-list.hbs, and an integration test: tests/integration/components/book-list-test.js. Let’s move the template code out of the app/templates/books.hbs file and put it in the app/templates/components/book-list.hbs file instead. Now, let’s change the code a little because right now, our component doesn’t know what model is. Instead, we’ll create a property on the component (in /app/components/book-list.js) called books. We’ll give it a default of an empty array for now:
export default Ember.Component.extend({
  books: [],
});
Ok, with that in place, let’s change our Handlebars template to use this new property:
<ul>
  {{#each books as |book|}}
  <li>{{book.title}}</li>
  {{/each}}
</ul>
See what happened there? A subtle change, but it makes the code cleaner and more readable. Now, hop back into the template from the last section (app/templates/books.hbs), and we’ll use our component:
{{book-list books=model}}
That’s all there is to it. We are simply passing the model that came from the route into the component’s property: books. This has made our main template much cleaner, and if we wanted to we could use this component on as many templates as we choose, even inside other component’s templates!
Now, let’s look at how we’d add some interaction to our component like we talked about earlier, and one of our motivations for creating a component. Let’s say we want to add an action to each of the books when we click on them, we’ll just log to console for now as an example. We’ll first start by adding an action to our LI tag (which will correspond to us clicking on the item). We’ll simply add an action using Handlebars to the ‘LI’ and we’ll also pass a parameter to the action of the actual book so we can retrieve the title:
<ul>
  {{#each books as |book|}}
    <li {{action "bookClicked" book}}>{{book.title}}</li>
  {{/each}}
</ul>
}
If you run the app now and try clicking on a title, you’ll get an error in your console telling you no action bookClicked could be found. We can solve this by adding an action hash to the component’s JavaScript file:
export default Ember.Component.extend({
  books: [],
  actions: {
    bookClicked(book) {
      console.log(book.get("title"));
    },
  },
});
That’s all there is to it! Of course, this is a contrived example, but hopefully you get the idea of how a component works. While not everything fits nicely into routes, templates, or components, Ember has place for those things as well.
Services
From the docs: “An Ember.Service is a long-lived Ember object that can be made available to different parts of your application”. They go on to talk about examples such as Logging, User/Session authentication, and Third-Party APIs. Services can be injected into various parts of your application including routes or components. We actually looked at a service earlier when we talked about the route. The this.store that we have inside the route uses the Ember-Data service. Say in our sample application that we wanted to communicate with a third-party to get information about new books. This would be a perfect place to use a service. Like the other things we talked about, Ember-CLI can generate services as well. Generating one is easy, ember g service <service-name>. We won’t generate one here, but I encourage you to look up the example in the guides.
Models
We sort of glossed over models in the routes section, but they are an important part of an application. Again, I’m going to assume you’re using Ember-Data, and you have models that look something like this:
import DS from "ember-data";

export default DS.Model.extend({
  title: DS.attr("string"),
});
Now Models may not look that exciting, but without them, what data would we have? By using Ember-Data we’re able to access various back-ends to load our data without touching our models. We could use the JSONApiAdapter (which is the default for Ember-Data 2.0+), the RESTAdapter or even your own custom adapter. One setting to your configuration and Ember-Data will know how to communicate with your API through calls like findAll, findRecord`, etc. Think of it like an O/RM for APIs. Under the hood, it’s using standard jQuery ajax calls, so you could customize the settings globally if needed, extending one of the adapters.
Adapters and Serializers
We just talked about Adapters in the last section, but another piece of the Ember puzzle is a Serializer. Within a serializer, you can customize how your API responses and requests are handled. This is pretty advanced, but shows the power of Ember-Data. Just because there are a handful of common Adapters and Serializers doesn’t mean they may exactly fit your back-end API. You can customize just about every aspect of communication by extending or creating your own Adapters and Serializers. What’s an example of a serializer? Let’s say you are using the RESTAdapter and RESTSerializer. Instead of loading child objects asynchronously, you could extend the RESTSerializer to tell it that you want to use the embedded JSON included in the initial call to the API.
Helpers
These sort of fall under Templates, but we’ll discuss them here. There are times in your templates where you’ll want to format a number as currency or maybe format a date using moment.js. That’s where helpers step in. Helpers are simply functions that format a value given one or more parameters (typically). There is extremely good documentation in the Ember guides on writing helpers. I encourage you to check them out.
Controllers
I’ve saved these for last for a reason. Coming soon to Ember (well, maybe not that soon as I just saw a tweet from Yehuda Katz saying they aren’t going anywhere until at least 3.0), they will be deprecating controllers. As of today, they are still supported and are required to do a handful of tasks. If you want to support query string params in your application, you need to use controllers. That’s really the only thing I would use them for today. In the past however, before services and components, these were the workhorses behind the template. We had Controllers (the JavaScript part of the equation), Templates (the “view” if you will) and the View (for Template interactions, think like wiring up jQuery components). Now, controllers are still around, but in efforts to make the framework more accessible to more developers, components and services are both ways around using Controllers (except for those very few tasks I mentioned earlier). I say directly because even if you don’t create one manually, one is created for each of your templates automatically. Why? Well, remember the model hook in the route? When you return a model from there, there is another hook that fires called setupController. In that hook, by default, it sets the model property on the controller, thus how we have a model in our template. I mentioned that “in efforts to make the framework more accessible to more developers” earlier, and then went off on a tangent. With Controllers (and Views and Models), developers thought of Ember as an MVC framework. While it is, it’s client-side MVC, which doesn’t follow the same paradigm as a server MVC. This confused many developers. Separating thinking about server MVC from client-side MVC is difficult. Personally, I didn’t fall into this trap, but many have, thus a change of thinking for the future. Yehuda’s recommendation (as of 2016-03-17) is to not rush to port all your existing controllers. If you’re starting with a greenfield application, know that it’s still ok to use controllers, but I would recommend seeing if what you are doing would fit into a different “box,” if you will.
Tests
Testing your client-side application is important because the language we’re using is JavaScript. You won’t find your problems until you run your application. Last thing you want is to find the problems during production, so test! Automated testing is your friend. Out of the box, Ember uses QUnit for testing, though you could replace that with something else like Mocha if you choose. Whatever you decide to use doesn’t matter as long as you have tests. It’s hard to get to 100% code coverage unless you’ve TDD’d every last thing, but any percentage is better than 0. QUnit is very easy to get started with, and again I encourage you to check out my tutorials on Test-Driving an Ember.js Application for a lot more details on testing. I’ve also published a series here on the Visoft, Inc. Blogs, with one post talking about just testing straight JavaScript, one about unit testing Ember, and one about Integration and Acceptance testing with Ember.
Conclusion
I hope that you’ve found this post useful. We covered a lot of different pieces of the Ember puzzle. I pointed out just about every last little thing (e.g. adapters and serializers) that you may encounter in an application. Know that you don’t need to use things unless you explicitly need them. There are conventions in the Ember framework that make working with it very easy, and a lot of the time the defaults for things will suffice.

Damien White Twitter
Hi, my name is Damien White. I'm a software architect with over 20 years of experience. I simply love coding! I have a driving passion for software development, and a thirst for knowledge that cannot be quenched. I enjoy writing Web and Mobile applications, and I'm happy to share what I know in my quest to learn as much as possible.