Riding Rails - Building a Web App (Part 01)

Now that you have Ruby and Rails installed, let’s put Rails to work by creating a real application. In this post, we’ll build a job search application. We’ll utilize GitHub Jobs as our initial data source, but the idea behind this app is to aggregate different job APIs eventually.
If you’re a developer, the last thing I need to tell you about is data types and constructs. I find those topics to be not only dull, but a waste of time. Thank you, but I know about loops, conditions, etc. I’d rather see a project-based approach to teaching, and that’s what I plan to do in this series.
The Plan
Before we venture into development, let’s take a moment and plan our approach. We know we’re going to utilize GitHub Jobs API and that we’ll be using Rails as our framework. Now we absolutely can send and parse data ourselves, but I did a quick search on Web and found a little Gem that will do that for us. It hasn’t been updated since 2014. However, if we see it’s out-of-date, we can always fork it and make the modifications needed.
We should decide on what templating syntax we’d like to use. The default is ERB, but personally, I like Slim. There is also HAML, but I find Slim to be nice and fast and the syntax is straightforward. For this application, I’m going to stick with ERB. This is the easiest since it’s what Rails uses out-of-the-box. That said, it’s cake to change to something else like Slim, it’s just adding a Gem to our Gemfile. Most importantly, I don’t want to introduce something new like Slim in this first tutorial.
Finally, let’s talk about testing. Personally, I practice BDD (behavior driven development) using RSpec in my Rails projects. BDD is similar to TDD (test driven development). The difference is how you look at the problem. While TDD focuses on units of work, BDD focuses more on the bigger picture of how the application will be used. Rails is set up for testing from the start. One of the things I absolutely love about Rails is how the environments work. We’ll see this in action as we start development. Rails’ default test framework is minitest. With minitest, we’re able to practice either TDD or BDD because the syntax adapts to whatever style we wish. Again, we’ll stick with the default test framework for ease of understanding.
Rails New
Do you recall how to create a new Rails application? Navigate to a “Development” directory of your choosing, and we’ll create a new application called job_slayer.
rails new job_slayer
This will create a job_slayer directory with our new application. Simply change into it using the command: cd job_slayer. Once there, fire up your favorite text editor and open the directory. Take a look at the folder structure of the application; it should look similar to Figure 1.
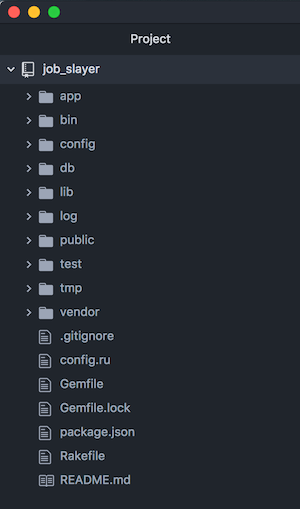
This is the structure of all Rails applications. We’ll be spending a lot of time in the app and test folders in this tutorial.
The last thing, you use source control, right? Well, Rails actually initialized our application as a git repository automatically. We just need to add the files that Rails created for us and commit the changes.
git add .
git commit -m "Initial commit"
We’re in a good place. Let’s start writing some code!
Models
We’ll start by creating models for our application. Let’s think about this a little bit. What models are we going to develop? This app is called job_slayer, so we probably want a job model. We’ll use this to capture information about a job. Since our end goal is to make this a job aggregator, we need to standardize the different results from the various sources (remember, we’re just going to be targeting GitHub Jobs for this tutorial). We should also cache the jobs we receive locally, so we aren’t pinging the API each time. This way, we can have a list of jobs on our homepage that users can browse through.
We have to think about the attributes we want on our model. If you look at the GitHub API docs, you’ll see some sample URLs and responses. I took a screenshot (Figure 2) of the fields that are provided to us.
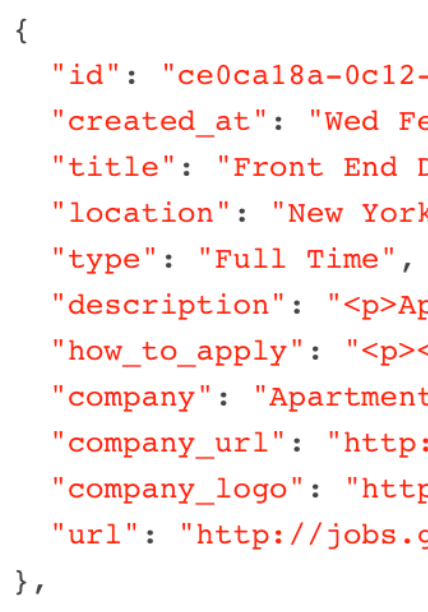
This is probably a good starting point for our job model. Of course, not all APIs are going to provide the same attributes, but we can always make changes to our model in the future.
We saw in the last tutorial how Rails comes with generators. You’ve seen the scaffold generator in action, and I promised no scaffolding for this application. That doesn’t mean there aren’t other generators that we can use. If you want to see all the things you can generate, run the command rails g --help. Since we need a model, we’ll utilize the model generator. This will create four files for us: the model, a database migration, a test, and a fixture file. You can see this from looking at the Rails generator docs (rails g model --help). The last thing that I’d like to mention is that if we provide the Rails model generator with the attributes we want, it will generate some code for us. You don’t need to provide attributes, but then you just get blank files for free. Notice that we aren’t specifying an attribute id, nor any timestamps. We’ll discuss this later. The list of attributes is pretty much identical to what we are receiving, with the addition of posted_at, source, and source_url. We’ll use these to store metadata about the job.
rails g model Job title posted_at:datetime location type description:text how_to_apply:text company company_url company_logo source source_url
Whew! That’s a long command because we have a fair amount of attributes that we want to store. Now let’s look at what was created and start working with this model.
What if you make a mistake with a generator command? Well, there is an “undo” that Rails provides, for our example, it’s merely
rails d model Job. Thedis a shortcut for the worddestroy. Go ahead, give it a try before we make any modifications. Just remember to regenerate the model!
Figure 3 shows the four files that were created.
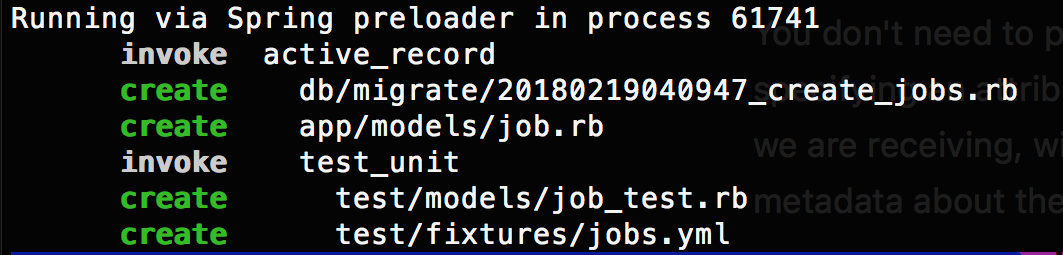
You’ll notice the first item is the database migration. Let’s take a detour before continuing with our job model and discuss it.
Migrations
Let’s look closer at the database migration that was created for us. It can be found in the directory db/migrate. You’ll see one file in that directory with a timestamp, that is the migration that was created. The migration is Ruby code that creates a table called jobs with the attributes that we specified in the command. Let’s investigate this file a bit more. You can see a shortened example of the file below.
class CreateJobs < ActiveRecord::Migration[5.1]
  def change
    create_table :jobs do |t|
      t.string :title
      t.datetime :posted_at
      ...
      t.text :description
      t.text :how_to_apply
      ...
      t.timestamps
    end
  end
end
It’s all pretty straightforward. Everywhere we didn’t provide a specific type is created as a string, which is exactly what we wanted. For the attributes where we specified a type, the type is represented in the migration. Assuming this is the first time you’re seeing a migration, let’s talk about the oddities of the file. At the top, class CreateJobs < ActiveRecord::Migration[5.1] This is how you define a class in Ruby. It inherits from ActiveRecord::Migration[5.1]. The [5.1] refers to the version of ActiveRecord (Rails’ ORM) created this file, and the double colons indicate that ActiveRecord is the “namespace” and that Migration is the class that we are inheriting for our new CreateJobs class.
This class has a single method, change. This same method gets called when we migrate and if we rollback the database. Everything from this point on is part of the DSL (domain specific language) that we use to modify the database. The create_table :jobs do |t| does what you’d expect, creates a table called jobs.
If you’re new to Ruby and you’re looking at that statement, the
:jobs, specifically the colon, may be confusing. This is what’s known as a Ruby symbol. If you follow that link, you can find more information about symbols. The easiest way to understand them is to think of them as “constants.” Unlike astringthey don’t store anything, they are just a name. If you’re still curious, there is plenty of information on symbols out there.
I feel that the Ruby code is pretty simple to understand, even if you aren’t a developer. The one oddity you’re probably wondering about is t.timestamps. No magic here, it’s just a little helper method that creates the created_at and updated_at columns. The cool thing about those columns’ names is that Rails will, by default, manage them for us. Now that is magical! To get the magic, all you need to do is name the columns correctly, and by using the timestamps method, it will do that for us.
You may be looking at this class and thinking that it’s pretty simple. There are no constraints of anything specified. If we wanted to, we could define things like defaults and indexes, but we’re not going to get into that level of complexity in this tutorial. Don’t worry though; we’ll handle things on the code side to prevent garbage data by way of validations.
Hmm, there’s still no
idcolumn specified, what’s going on? Well,create_tablewill automatically add theidcolumn (unless you tell it not to). Honestly, without anidhow would you identify and delete records easily?
Now to migrate your database (which will create it automatically for us in SQLite), it’s a simple command:
rails db:migrate
If you’re using an older version of Rails, < 5, then the command is similar, it’s rake db:migrate instead. Go ahead and migrate your database now.
Review
In the first part of this tutorial, we got our first look at models and migrations in Rails. We used the Rails model generator, and you saw there is no magic involved. Your mileage may vary using generators, and you may find you prefer to create files yourself instead. There’s no harm in that at all. In fact, I often do that exact thing when I’m developing. I invite you to explore the help files for the generators, as there are various customization options (rails g model --help for example). You can even customize the files generated with your own templates if you want. Finally, Rails has both the model and a migration generator (that command, you guessed it, rails g migration,). Personally, I find the migration generator to be the most useful as it gives me a starting point quickly.
In the next part of the tutorial, we’ll go back to working on the job model. We still have work to do there, as we need things like validations and tests. I hope you found this first part of “Riding Rails” to be helpful. As always, let us know what you think.

Damien White Twitter
Hi, my name is Damien White. I'm a software architect with over 20 years of experience. I simply love coding! I have a driving passion for software development, and a thirst for knowledge that cannot be quenched. I enjoy writing Web and Mobile applications, and I'm happy to share what I know in my quest to learn as much as possible.