Riding Rails - Building a Web App (Part 05)

Hello again and congrats! You’ve made it to the end of the series (Part 5) of Riding Rails. Today we’ll develop a details view for each job and wrap up the series. This series is just a taste of what you can do with Rails. Anyway, let’s get started
Yikes! Here you are at Part 5 and you haven’t read the others? Check out Part 1, Part 2, Part 3, and Part 4.
Last Time
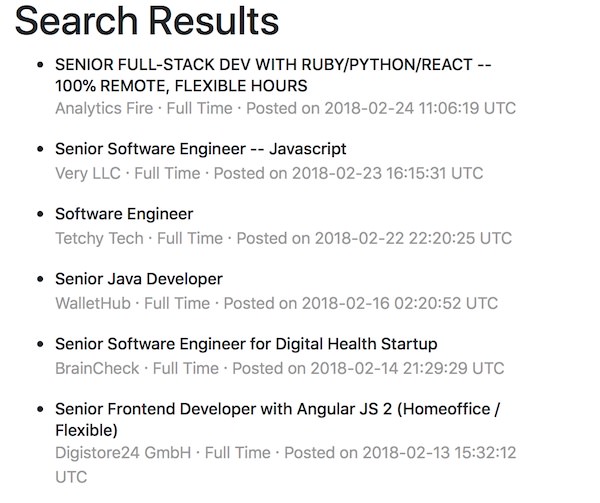
Last time you had some homework to work on creating a better partial view for each job. How did you make out? I’m sure yours look better than Figure 1!

And the tiny bit of ERB code that produced Figure 1.
<li class="job">
<h6><%= job.title %></h6>
<p>
<%= job.company %> · <%= job.type %> ·
Posted on <%= job.posted_at %></p>
</li>
This sets us up to change the title into a link to the details, but before we venture into that, there are two glaring issues with our search results. First, they aren’t sorted by date. Second, that date isn’t exactly friendly. Let’s fix that sort first.
Sorting
We get jobs in two places in our app, and from two different sources. First, we’ll tackle the homepage. Since we are querying our database and utilizing ActiveRecord, there is a method we can use called order. Hop into the HomeController and make that change, tacking it on the end of limit.
If you review the ordering docs, you’ll see that the default order is ascending. Not exactly what we want, so we’ll specify descending.
class HomeController < ApplicationController
  def index
    @jobs = Job.limit(10).order(posted_at: :desc)
  end
end
That was easy, right? Now onto the SearchController. We are querying GitHub Jobs here and just taking them in the order that they come to us. The jobs here are in an Array. Here we’ll use Ruby’s sort_by method to do the sorting.
class SearchController < ApplicationController
  def index
    redirect_to root_url if params[:term].blank?

    results = GithubJobs.import(params[:term])
    @jobs = results.sort_by { |r| -r.posted_at.to_i }
  end
end
The code is separated into two lines for clarity. You can also call sort_by tacked on the end of the import method. Anyhoo, what’s going on here in the code block is that it’s taking a result (job) from GitHub, and converting it to an integer so that we can sort it in descending order (denoted by the minus sign). By default, the sort would be ascending, like Rails. We could have also used Ruby’s sort to do the same thing.
With that out of the way, let’s work on that date.
DateHelpers
Rails has a bunch of DateHelpers available. We can utilize time_ago_in_words to give our date a nice look. To see something like “2 days ago” is nicer than a big long date string. Using this is super simple, open up your _job partial and call the method with the date like so:
<li class="job">
<h6><%= job.title %></h6>
<p>
<%= job.company %> · <%= job.type %> ·
Posted <%= time_ago_in_words(job.posted_at) %></p>
</li>
This is a handy, built-in helper that Rails provides. If it didn’t, we could have written a custom helper, which is just a function to do what we wanted. We’d call it the same way as time_ago_in_words.
Details View
Our app is coming along; however, without being able to see the details of the job, it provides minimal value. We’ll fix this shortcoming in the following sections.
Resource Routing
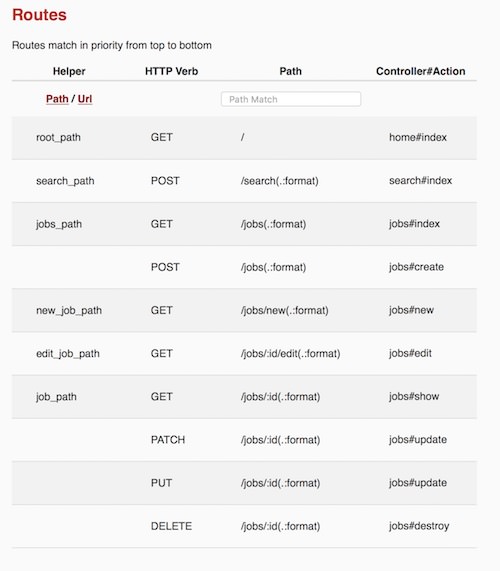
We’ll start by creating a JobsController, and we’ll utilize resource-based routing, one of the greatest features of Rails. The concept of resources in Rails simply equates to setting up actions for CRUD based operations related to a model. Instead of specifying seven routes, we can denote a resource and only have one route in our routes.rb file. You’re probably wondering about the seven routes. Well, they are all related to CRUD operations, so you have (this is the HTTP verb and the action name): GET index, GET show, GET new, GET edit, POST create, PUT/PATCH update, and DELETE destroy.
Let’s see it in action and see what Rails does. Navigate to http://localhost:3000/foo (an undefined route) in development. You’ll see we have two routes right now, root and search. Now open up config/routes.rb and add the following line under the two routes we previously added:
Rails.application.routes.draw do
  ...
  resources :jobs
end
Refresh the browser, and you’ll see the new routes:

Now for our app, we don’t need full resource routing because we won’t have CRUD operations available to the user for now. All we need is the GET jobs#show route. We can do this two ways, by specifying a get route, as we saw in an earlier part of this tutorial, or we can tell Rails either the actions we want to include (only) or exclude (except). Since we only need one, we’ll use the only option:
Rails.application.routes.draw do
  …
  resources :jobs, only: [:show]
end
If you refresh http://localhost:3000/foo, you’ll see that we now have only three routes. Now let’s work on the controller and view for the show route.
JobsController
Let’s create the JobsController now. Create a new file in app/controllers called jobs_controller.rb. In that file, we’ll need just one action, show:
class JobsController < ApplicationController
  def show
  end
end
Now in this action, we need to handle two use-cases. The first is if the user clicks on our homepage where we have the job records stored in our database. This is the typical use case. But in ours, we need to handle results from our database and ones from the search. For jobs not in our database, we’ll look up the details based on the details_url that will be passed to us.
class JobsController < ApplicationController
  def show
    id = params[:id].to_i
    if id > 0
      @job = Job.find(id)
    else
      result = JSON.parse open("#{params[:details_url]}.json").read
      @job = Job.build(result)
    end
  end
end
That code should be pretty self-explanatory. First, we convert the params hash’s :id to an integer. Normally, we could just pass in the params[:id] directly to find, but here we want to make sure the value is greater than zero. We’ll be passing in an id of zero when the record isn’t part of our database. In the else we’ll get a :details_url passed in via the params, and from there we can query GitHub Jobs and get the details. If you’re new to Ruby, the string may look a little strange ("#{params[:details_url]}.json"). This is Ruby’s string interpolation. First, you need to use double quotes for this. Next anything between #{...} is a Ruby command/variable. So here we’re just appending .json to the end of the details_url.
Show View
Let’s see if you can add the view without guidance. Remember, it’s convention based. We have a JobsController with a show action; what does Rails expect? Here is a sample layout for your job show view:
<div class="container">
<div class="row">
<h1><%= @job.title %></h1>
<div class="col-md-8">
<p>
<a href="<%= @job.company_url %>">
<%= @job.company %>
</a>
· <%= @job.type %> ·
Posted <%= time_ago_in_words(@job.posted_at)%> ago
</p>
<p><%=raw @job.description %></p>
</div>
<div class="col-md-4">
<img src="<%= @job.company_logo %>" alt="Logo" />
<p><%=raw @job.how_to_apply %></p>
</div>
</div>
Most of this should be easy to understand, except for raw. By default, ERB will escape HTML characters with the standard output brackets (<%= ... %>). In this case, we’re getting our description and how_to_apply from a trusted source (GitHub Jobs), and we want the HTML to render. To do this, we specify the raw helper, which will do exactly what we want. Be cautious with raw; we’re only using it here because of the trusted source. If this were user input, there could be malicious code, and we wouldn’t want to execute it.
Did you figure out where to put the file? If not, it’s app/views/jobs/show.html.erb. All views go into the app/views directory. Since we have a JobsController, Rails will look for a jobs directory. In the controller, we have one action, show, thus the show.html.erb file.
Linking
At this point, we need to change our _job partial to link to the show action. The route helper methods created are job_path (relative path) and job_url (absolute URL). With this knowledge, we can change the job partial. We need to have a condition here; if we have an id we’ll link to the job with just a path of /jobs/:id. However, for models that have an id of nil (ones from GitHub Jobs), we will pass in a zero for the :id and pass along the source_url as a query string parameter.
<li class="job">
  <h6>
    <% if job.id %>
      <%= link_to job.title, job %>
    <% else %>
      <%= link_to job.title, job_path(0, details_url: job.source_url) %>
    <% end %>
  </h6>
   ...
</li>
In the first case, we can just pass along the job model and Rails will automatically use the id property passing it to the jobs_path. This is simply a shortcut method on link_to. Otherwise, we’ll explicitly build the job path using the helper method job_path giving it an id of 0 and a details_url query param of job.source_url.
Now go ahead and give both use cases a try (from the database, assuming you have some records and the search results). Both should work, and you’ll see the different URLs based on the way you entered the show route.

Wrap Up
Congrats, you’ve made it! It’s been a reasonably long ride over the past five parts of this tutorial, Riding Rails. We walked through building a simple application with Rails. In this last part, we skipped testing because of time, but I would encourage you to go back and add tests. That’s one of the advantages of using generators since it creates a test file for you. However, there’s no reason why we can’t build one ourselves.
Remember, this application works, but could use some more coding. For example, we only handled GitHub Jobs, and we wanted to make this an aggregator of jobs from different sites. We didn’t persist any jobs to our database, but we saw in Part 3 how to do so. Like any app, there is always room for improvement.
Anyway, I hope you enjoyed the series. Feel free to leave a comment or contact us. Happy Rubying!
